Friday, November 4, 2011

Simple Southern Favorites

The next two recipes use turkey sausage, green pepper, onion, and chicken broth in addition to a few other ingredients. I think they are both quick and easy to make. The additional ingredients only vary slightly so when I make one I usually make the second in the next day or two. Since I don't use a whole pepper, onion, or sausage for either recipe I need to use what's left while it's still fresh. The two meals are also prepared almost identically. The first recipe, Gumbo, is prepared as a soup. The second recipe, Shrimp and Grits, is prepared as a mixture to top a bed of grits.
Chicken and Sausage Gumbo
           1 8 oz Chicken Breast                   1 link or 7 oz Turkey Sausage 
 1/4 Medium Onion                      1/2 Green Pepper
 1 Can of Tomatoes and Okra            Low Sodium Chicken Broth
Cajun Seasoning                                  Oil 
Brown Rice

  • Begin cooking your brown rice. Typically brown rice will take 30-45 minutes. Once the rice starts cooking this should be enough time to prepare and simmer your gumbo having both finish at the same time. 
  • Chop your green pepper and onion. 
  • Cut your sausage into thin slices.
  • Saute your green pepper, onion, and sausage in a pot together with a small amount of heated oil. Season to taste with cajun seasoning.
  • While you're sauteing the first three ingredients slice your chicken breasts into thin, small strips. 
  • Once the vegetables soften and the sausage shows the first signs of browning add the chicken. 
  • Cook together until the chicken is almost cooked throughout. 
  • If the mix seems too greasy you can drain it. Since I'm using turkey sausage I usually don't drain to keep the flavor. 
  • Add your can of tomatoes and okra along with chicken broth until the pot is about 1/2 way full. 
  • Let simmer on medium-low heat for at least 15 minutes if not more.
  • Serve over brown rice with cornbread.

Serves 4

Shrimp and Cheese Grits
       Around 30 Medium Size Shrimp             1/2 Link or 7 oz Turkey Sausage
1/4 Medium Onion                         1/2 Green Pepper
                       Low Sodium Chicken Broth                            Oil
   Grits                                          Cheese
Heavy Cream (Optional)

  • Chop your onion.
  • Cut your green pepper and sausage into thin slices.
  • Saute in a frying pan with a small amount of heated oil. 
  • Season with salt, pepper, and garlic powder. 
  • While you're sauteing the first three ingredients peel and devein your shrimp.
  • Once the vegetables soften and the sausage shows the first signs of browning add the shrimp. 
  • Cook together until the shrimp just begin to pink. This can happen quickly depending on the size of your shrimp. 
  • Add enough chicken broth to allow the mixture to float. Not too much. 
  • I prefer a light broth so I only use chicken broth. If you prefer more of a creamy or gravy sauce add cream to the mixture. 
  • Let simmer and thicken for a few minutes, enough time to allow the shrimp to cook throughout
  • Depending on the type of grits you are using allow enough time to prepare so that the grits will finish the same time as your shrimp mixture. I often will just use instant grits that only take 5 minutes to prepare. Add cubes of cheese to taste to give your grits that extra boost of flavor. A few suggestions are cheddar cheese, pepper jack, or gouda. 
  • Serve the shrimp mixture over a bed of grits.

Serves 4


Thursday, October 27, 2011

Pinterest Dinner

Last night’s dinner was fueled by my Pinterest addiction. I took a look around my Mmmm, Mmmm, Good board and found three recipes that worked with stuff I had in the kitchen. 
Menu
Cucumber Cup Salads, Bacon Wrapped Chicken, Garlicky Fries.
(Following the below links will take you to my Pinterest. You can then click on each items respective link for original postings.)

Cucumber Cups

These very cute cups were very easy to make. They do only hold a minimal amount of salad. I assume you can perfect your skill in constructing the cups over time. 

  • Slice thin strips of cucumber with a vegetable slicer. 
Leave the peel on. It will help your cups stand up. I also sliced my strips with a knife. They weren't quite thin enough so I used a bar glass to shape them, then placed glasses in the freezer to help set the cups. 
  • Toss a small salad. 
  • Once the cups are set stuff them with your salad. 
  • Garnish with two half slices of bacon sticking up the back side of the cup. 
 
Bacon Wrapped Chicken Bites
Very tasty, very easy, but cooked a little too long

I always buy the value pack of boneless chicken breasts. I then take each breast, trim it, cut it into a 4 oz portion, package two pieces in a freezer bag, and freeze. This really helps down the line with portion control, defrosting, and meal planning. 

  • Take a 4 oz piece of chicken and slice it into 3 nice size chunks. 
  • Season or baste it with sauce of your choice. 
I used an all purpose dry rub. Other recipes I have seen recommended the basting the uncooked chicken with  honey mustard. I'm not a honey mustard fan so I chose to skip the sauce. However, my chicken did turn out a tad on the dry side. Perhaps using a sauce would have helped prevent this. 
  • Wrap each chunk in a half strip of bacon. 
  • Place in a baking dish. 
  • Bake on 425.
Cooking times will depend on your size of chicken pieces. Baking for 45 minutes alongside the potatoes below was a little too long for mine.


5 New Potatoes
5 Tablespoons Olive Oil
2 Tablespoons Minced Garlic

Dry Ingredients:
3 Tablespoons Cornstarch
1 1/2 Teaspoons Sea Salt
1 Teaspoon Pepper
1/2 Teaspoon Garlic Powder
1/4 Teaspoon Cayenne Pepper

  • Warm 5 tablespoons of Olive Oil and 2 Tablespoons of Minced Garlic for about 1 minute in the microwave.
  • Slice 8 New Potatoes into Wedges.
  • Toss the wedges in the warmed garlic and oil.
  • Microwave potatoes in oil for about 5 minutes. Stirring once half way through.
  • Mix all the dry ingredients in a small bowl.
  • Sprinkle mixed dry ingredients over warmed potatoes and toss.
  • Bake on 450 for about 30 minutes
  • Flip wedges once halfway through cooking


Thursday, October 20, 2011

I'm baaack..Asparagus Fritters

After a super long hiatus I’m back. Caught up in the whirl wind of life I somehow allowed blogging to fall off the To Do List. What this now means is that I have a surplus of recipes, pictures and even a food festival to throw in. So enjoy!
I found this recipe while browsing through another blog, Closet Cooking. I always enjoy trying new things, new concepts, even putting a new twist on an old favorite. I thought this was a great recipe to try because I love asparagus and who doesn’t care for a little bit of fried goodness?
Here is Kevin from Closet Cooking's Recipe……..
Ingredients
  • 1 pound asparagus, trimmed
  • 1 handful dill, chopped
  • 1 handful parsley, chopped
  • 2 green onions, chopped
  • 1/2 cup feta, crumbled
  • 1 egg
  • salt and pepper to taste
  • 1/2 cup flour (I like to use whole wheat)
  • 2 tablespoons oil
Directions
1. Grate or process the asparagus in a food processor. (I actually just chopped-Ruby)
2. Mix the asparagus, herbs, green onions, feta, flour, egg, salt and pepper and enough flour that the mixture will hold together.
 

3. Heat the oil in a pan.
 
4. Spoon the asparagus mixture into the pan and cook until golden brown on both sides, about 4 minutes per side. 


Ingredients
·         1 egg (lightly beaten)
·         1/2 lemon (juice)
·         1 tablespoon dill chopped
·         1 tablespoon capers
Directions
1. Whisk the egg in bowl until frothy.
2. Slowly whisk in the lemon juice followed by the water.
3. Heat in a small sauce pan while whisking until the sauce thickens, mix in the dill and capers and remove from heat. (Do not bring it to a boil.)

I tried the fritters two different ways. Of course as I was making the first batch I tried a few as a snack. They are delicious on their own. I imagine they would make a great accompaniment to a salad or also served as an edible garnish aside a meat dish. For dinner I served the fritters topped with a poached egg and avgolemono sauce just as Closet Cooking suggests. The egg and light zestiness of the sauce definitely complimented the fritters in their search to become a full meal. I served them alongside roasted potatoes and green beans with parmesan olive oil sauce from SteamFresh. Overall, a very delicious meatless dish. 

Friday, June 3, 2011

Vidalia Onion Pie

Being born and raised in the south how have I never had, much less even heard of, Vidalia Onion Pie? I'm not sure, but once a coworker mentioned this in the office I knew I had to try it! Who wouldn't love a savory pie made of sweet vidalia onions, filled with a light egg mixture, and baked to perfect fluffiness? I know I would!

My coworker passed on the recipe she uses, Paula Deen's. I took a quick look and knew this would be a piece of cake...or should I say a piece of pie! ;-) After discussing this delicious treat with my boss we thought maybe adding some cheese would make this the pie even better. In comes the parmesean!

So with a lot of inspiration from Paula Deen and my coworkers I present you.........
Vidalia Onion Pie 

 One area of the pie was left without bacon for another coworker.

Ingredients:
1 large Vidalia onion, thinly sliced                                       6 slices of bacon
2 tablespoons of butter                                                       2 eggs
small 8 oz container of sour cream                                      1/2 cup of milk 
salt                                                                                     1 pie shell
Parmesan cheese                                                     3 big spoonfuls of flour, 
                                             (appox. 3 tablespoons, I can never find a measuring spoon!)

1.  Preheat the oven to 325 degrees.
2.  Cook 6 pieces of bacon to well done. You want them crispy because you'll be crumbling them later.
3.  As soon as the bacon is finished remove it from the grease and immediately add your onions to the pan. I also added 2 tablespoons of butter.
4.  Saute the onions in the bacon grease until they are really soft and not quite browned.
5.  In a mixing bowl, whisk together 2 eggs and 3 big spoonfuls of flour.
6.  Add 1/2 cup of milk, 1 small container of sour cream (8 oz.), and a few sprinkles of salt. Mix all these ingredients together until the mixture is really smooth.
7.  Layer your sauted onions in the bottom of the pie crust. Then top the onions with your egg mixture. I had a little extra egg mixture. If you're using a deep dish crust, it should fill it right up.

8.  Top the uncooked pie with a generous handful of shredded parmesean cheese. Then top with crumbled bacon.
9.  Bake for 40 minutes or until the pie is firm in the middle.
10.  Remove your pie from the oven and let it cool.
11.  Slice and serve
***If your pie crust starts to brown too soon, cover the crust with a thin piece of aluminum foil. 

Inspired Vidalia Onion Pie

Big Day

Today is officially the big day!

Foodista Food Blog of the Day Badge


Thanks to our friends over at Foodista Dinner for Two, Please is being featured as the Blog of the Day!
Yay!

Please check out all their great tips on incorporating different ingredients and using new techniques and tools, as well as the awesome recipes and blogs that have been submitted to this foodie community!

Wednesday, June 1, 2011

Quick Dinner Ideas: Creamy Chicken Gnocchi Bake

In another rush to make something for a dinner I had forgotten to plan I started scrambling around the kitchen looking for something to whip up. I wanted to make something good, didn’t want to run out to the store, and it had to be something fairly easy because I was exhausted. Out of the corner of my eye I saw a Publix Apron’s Recipe Card. The recipe was for a dish the Publix Snack Man was making the other afternoon. As I began to read down the list of ingredients I realized it called for gnocchi, Philadelphia Cooking Cream, a new favorite, and vegetables I loved, but didn’t have in the house. “Guess I won’t be making this one tonight.” There was also no way I was getting the lover boy to eat artichokes and roasted red peppers without warning him beforehand either. I set the card down and as I walked away I realized I could easily put my own spin on the recipe using things I had in the kitchen and preparing differently so it didn’t take as long. So here is my homemade, Publix inspired, version of what will become a new favorite!
Publix inspired….Creamy Chicken Gnocchi Bake

3 Chicken Breasts Cubed and Cooked
1 Package of Sliced White Mushrooms
1 Bag of Microwaveable Steamed Broccoli
1 Package of Prepared Gnocchi
1 Container of Philadelphia Original Cooking Cream
Butter
Garlic, Salt, Pepper
Parmesan Cheese

  1. Boil water for the gnocchi. Once the water is boiling, add the gnocchi and let them cook until they begin to float. As soon as they being to float remove them from the water.
I did not go all out and make the gnocchi myself this time. I was not that adventurous or energetic. However, the prepared gnocchi turned out just fine
2. Melt some butter in a pan and sauté the package of mushrooms with garlic, salt, and pepper to taste until the mushrooms are soft.
3. Microwave the broccoli approximately ¾ of the directed time.
4. Add the cubed chicken and broccoli to the sautéed mushrooms just to warm.
5. In a mixing bowl add your chicken mixture, cooked gnocchi, and the whole container of Philadelphia Original Cooking Cream and mix well.
6. Transfer all of this to a casserole dish and bake from about 20 minutes in an oven preheated to 350.
7. Sprinkle with Parmesan Cheese for the last 5 minutes.


Voila!
Thank you Publix!

Creamy Chicken Gnocchi Bake

Cinco de Mayo

Happy Cinco de Mayo!...a little late, I know!

You all know I love a celebration! So in honor of everyone’s favorite Mexican holiday we went with a Mexican inspired dinner.

Carnita Style Chicken Tacos with Fajita Rice, Corn, Chips & Salsa, and ice cold Coronas!

I slow cooked the chicken all day. Before I left for work I threw three chicken breasts in a crock pot filled with water and a taco seasoning packet. By dinner time the chicken was falling to pieces. I drained the chicken and shredded it finely. I should have reserved some of the water to let the shredded chicken soak in while we constructed our tacos, but by the time I realized this it was too late. Next time I’ll have to keep this in mind. The tacos were served with shredded cheese, diced onions, chopped cilantro, and lime. Keeping tacos simple and authentic like this is my favorite way.

I will shamefully admit that our Fajita Rice did come out of a Rice-A-Roni box.

The corn however, was delicious. I pulled the husk down on two ears of corn and cleaned them off. I then rubbed them with butter, garlic, salt, pepper, and chili pepper for a little spice. I wrapped the ears back up in their husk, wrapped them again in aluminum foil, and baked in the oven for about 45 minutes.
The corn was so good even little Dank wanted some!

The dinner was also served with chips, salsa, and some very refreshing coronas! Ayi yi yi!

Fiesta Foreva!

Taco

Meatless Monday


Breakfast:

One Egg, Gouda Grits, Mango
Breakfast was fairly simple. I had one egg over easy topped with parmesan cheese with gouda grits and a diced mango.


Lunch:


Eggplant Stack
Yes it was frozen, but also very delicious. I tried to trick myself by eating it off a plate instead of out the plastic tray.


Dinner:

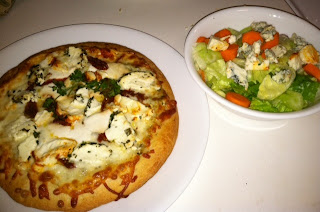
Goat Cheese Pizza and Blue Cheese Salad
I was in a mood from some good cheese. My pizza was topped with mozzarella, LOTS of goat cheese, sun dried tomatoes, and parsley. My salad was rather simple with greens, carrots, celery, and some delicious freshly crumbled blue cheese.

Monday, May 2, 2011

Quick Dinner Ideas: Chicken Lettuce Wraps


 I'm in a rush, five million things to do before, during, and after work, walk the dog, clean the house, lover boy's asking me what's for dinner.....Dinner? Oh my goodness! What is for dinner?

Ever been there before? Sure ya have!

I find myself in this situation quite a bit. I usually run to the computer and google "quick, easy, dinner ideas," because at that point in the day I can no longer think. I try to quickly browse through the results and find something I can make with what I have on hand. 

With nights like those in mind, I'd like to start adding some quick, easy dinner ideas to the blog. Not only is it helpful for me to be able to go back and see what I made last time I was in a bind, but I hope it also helps when you're caught up in life's fast lane.

 Chicken Lettuce Wraps
This recipe is great if you have leftover chicken breasts hanging around the kitchen.

All you need:
3 Chicken Breasts
1 Can of Diced Water Chestnuts
12 Green Leaf Lettuce Leaves
2 Carrots
Sesame Seeds
Peanut Sauce

This recipe takes about 20 minutes with prep time if the chicken is already cooked!
The fantastic thing about this recipe is that it is so versatile. You don't have to use green leaf lettuce. You can use any type of lettuce you prefer. You can even switch up the chicken with beef or shrimp. Also, try using different vegetables like peppers or mushrooms if you have them around.

You can find my own personal recipe here at Foodista....

Wednesday, April 27, 2011

Meatless Monday....or Bust!

So this Meatless Monday was a BUST!
I was not happy with pretty much anything about it!
Here we go....

Breakfast:
Shirred Eggs
I went with my current Meatless Monday favorite, shirred eggs. I topped the eggs with parmesan cheese and parsley pesto. I'm not sure why, but something about it just didn't do it for me today. :-(

Lunch:
Broccoli and Cheese Soup, Grilled Cheese
For lunch I brought broccoli and cheese soup and a grilled cheese. This didn't go well  either.  
How do you mess up a grilled cheese? 
I made the sandwich in the panini maker. The first go round I did not cook it long enough. The cheese was no where near as ooey and gooey as I prefer. I stuck the grilled cheese back into the panini maker, left the kitchen for a few minutes, and came back to a panini maker filled with cheese in every ridge and two pieces of bread. All of my cheese had melted out of the bread! 
Ugggh!
(Picture was pre panini maker disaster)

Dinner:
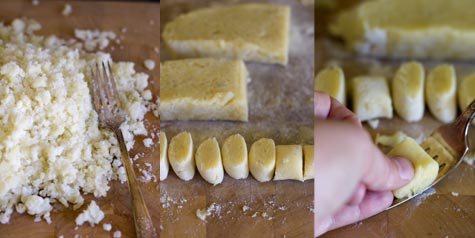
(Picture courtesy of 101 Cookbooks)
Gnocchi 
So when it came to dinner I needed something to cheer me up. I decided to make delicious potato gnocchi. Lover boy and I both LOVE gnocchi. Now I have never made gnocchi before from scratch. I've seen it made on television, read countless articles and recipes, and have watched just about every contestant on Top Chef bomb at it. 
I get it....it's hard to perfect. 
Apparently you need to be an Italian grandmother to make delicious, homemade gnocchi. This is exactly why I chose this recipe! How to Make Gnocchi like an Italian Grandmother Recipe
You know me... I like a challenge. I said to myself, "I can do this. I can make anything!" So off I went......

As I prepared the potatoes and made the dough everything seemed to be going just fine. The dough was just floured yet tacky enough. I rolled the dough out, cut it in sections, and began to shape each gnocchi. This seemed to be working out well for my first time. 


Just as every recipe said....this is something that you perfect over time. After working with the gnocchi you realize what works and what doesn't.
In walks lover boy....with his know it all self. :-) Here he goes telling me how gnocchi is an Italian art form and all about his grandma making it when he was a child.
You're grandma has a gnocchi recipe?! Why'd ya wait til now to tell me this?!
Still, so far so good.
Now it's time to cook the gnocchi.
I boiled the first batch in the same starchy water I used to cook the potatoes. I let them rise to the top and spooned them out as they floated. Luckily, I had a lot of extra gnocchi...

.....MUSH!
Now what?
I knew that I wanted to serve the gnocchi with a brown butter, sage sauce. I already had some butter and sage simmering in a pan. I threw the second batch of gnocchi straight into the butter and let it sauté for about 5-10 minutes. This batch came out a lot better!...a lot more edible!


As far as the finished product goes, I think I did ok. Just ok. I gave myself a C on the grading scale. I had an edible finished product, but not something I'd like to brag about. I think it still had too much of a potatoey taste to it, but the brown butter sage was just enough to correct that.

Overall I think that the gnocchi won this battle, but I gave it a good fight.
And I will be back!


Gnocchi on FoodistaGnocchi

Giveaways!

I love contests. Between my lover boy and I we win lots of things! Maybe he has the luck of the Irish and maybe I'm...well just lucky!

Now that I'm part of two, and hopefully more to come, blogging communities I'd like to get involved in giveaways. I see lots of bloggers doing contests that give away some really cool things. I suppose once you have a good number of followers you are able to reward said loyal followers with awesome prizes. Sounds good to me!

Non-food related, here are links to two awesome giveaways: Nautical by Nature's Shabby Apple Dress Giveaway and Pink and Green Everything's Dahl House Frame Giveaway.

Shabby Apple has the cutest collection of dresses to fit every body type. And they aren't too badly priced either!


Check it out!

Tuesday, April 19, 2011

Meatless Monday

I'm going to keep this short and sweet.....two posts in one day!


Breakfast:

Shirred Eggs with Parmesan Cheese and Chives
Seedless Navel Orange
Repeat from last week.


Lunch:

Moe's!
Black Bean Over Achiever Taco
Chips, Queso, and Salsa Verde


Dinner:

New Recipe!
Cornmeal Crunch
(which can be found  at Profesional Bakist and 101 Cookbooks )
Balsamic Roasted Vegetables